If you have been out on the trail recently, you may have noticed A, a lot more people have solar-powered gadgets and B, everybody seems to have an expensive cooler. Well, that is what I observed last time out.
So my current heavy duty diy cooler none other than the standard blue 48 Quart Coleman cooler.
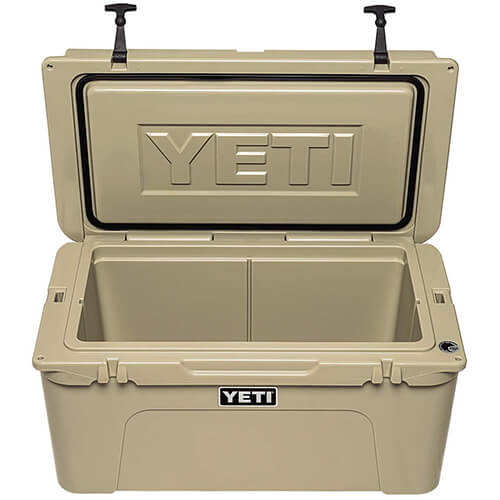
It has been great, I’ve had it for over 15 years, and it still holds up well, but I want to see what the difference was between this Cooler and the expensive Yeti coolers.
So you can jump right in to this guide, let me introduce what you will need to immediately and easily upgrade your coolers temperature. Make sure you have the following before proceeding.

What you need to follow along for this DIY upgraded cooler insulation guide
- A cooler with a hinge lid. Preferably a older style cooler or one that you don’t mind getting a bit rough with
- Some small tools like a screwdriver to unhinge the cooler lid from its body
- A drill to drill holes into the lid
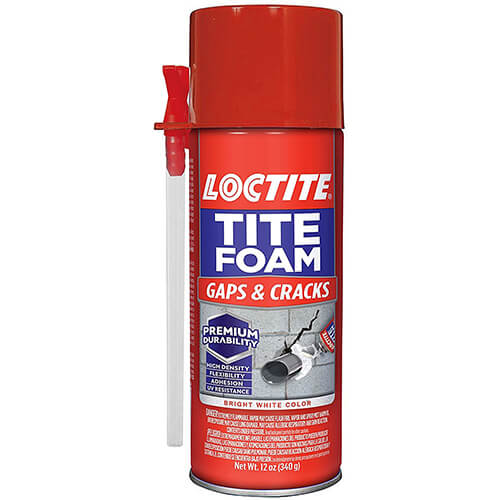
- Expanding Foams or Spray Foam for insulation
- Wire brush for cleanup
Once you have the above items, read on to find out more instructions on how to insulate your cooler to retain maximum cold temperatures.
That viral video
You may have seen this viral video on youtube where they dissect a high-end Cooler in half and what stood out to me the most is that.
- The wall thickness seemed a fraction thicker,
- There was visible foam insulation inside the walls and.
- The most surprising factor was that the expensive coolers lid was hollow, there’s no foam up here inside the top.
- Not to mention how easy I saw it was to run my hacks on my old cooler, know what I knew now.
Bear proof marketing
On a side note, the most high-end coolers market themselves as being Bear proof. But the Cooler in the video didn’t look like it would put up much resistance to the Apex predator.
So just a tip, don’t buy a Cooler if its primary selling point is that its Bear proof. Make sure to look at other practical factors that can help sweeten the overall product if you’re going to drop a lot of money on a cooler.
The end game
So in this article im going to outline a few steps that you can take to make your cheap $50 Cooler as close as it can in achieving the longevity and subzero temperatures that some of the most expensive $200-$500 Coolers on the market claim to do.
Just a little plug, if you enjoy reading these DIY quick camping hacks make sure to check out the Lifestyle and Base camp Archives here on Venchas.
Other methods
There are some popular methods on there where is shows people not taking care and taking a hole can of insulation materials and filling up the base and walls off their cooler.
I call this the lazy, messy and ugly method and the biggest drawback of this method is that your losing the real estate within your cooler that you might need to fit and extra few steaks or a six pack of beers inside the cooler.
And no one wants a conservative cooler when they are out on the lake fishing and need a cold brew.
Take off the lid
If you’re looking for cheaper coolers, the cheapest and most effective way to close the gap on your way to creating that DIY insulated cooler is by simply enhancing the lid.
Completely separate it from the body of the Cooler. From here on, you should be working exclusively on the lid without having to work around the body.
What insulation to use
Once the lid is off, its time to get to procure the insulation material to put inside the cover.
Just a warning, and it’s probably too late now if your reading this but, if you are not overly attached or sentimental to the outcome of your Cooler, then keep reading.
The next steps have been known to become a bit messy and, if done improperly, destructive to your clothing, your workspace, and your Cooler.
So the material to use on this diy cooler project is best insulation for homemade cooler and it’s (drumroll) Expanding Foam. From personal experiments and scores of camping and sporting forums.
I have concluded that Expanding Foams have the best return on investment.
Isocyanate and Polyol Resin
These are the two main chemical compounds that makeup Spray Foam. When both are combined, the chemical reaction creates a solid product that can be up to 60 times its original state.
A can of this stuff will set you back about $15 maximum from your local hardware store. Most will come with a little hose that’s perfect for inserting into the Cooler lid fill all the tiny crevices.
For this DIY you need a drill
So the next thing you’re going to do, you’re going to get your little straw applicator and pick out a drill bit that’s a little bit bigger than that straw applicator.
Pick a section of the underside of your Cooler, a tall hollow area, and drill a few little holes just big enough to get that Expanding Foam’s straw through and spray Foam around.
So with all those holes drilled, the next thing we have to do is spray the stuff in there.
The fun part
Now, don’t go overboard or too fast, filling the cooler lid up with the Spray Foam. You will get the hang of it, but what you’re going to want to attempt to do is fill it up enough to expand.
Don’t fill it up too much that it all expands back out of the drill holes.
And certainly don’t underfill it, as having gaps in the lid without the Foam will create vulnerabilities an inconsistent cooler.
Handling Spray Foam
Although this canned Foam is terrific, be aware that it does expand fast, and one thing I will caution you about is if you get this stuff on your skin, you’re in for a rough time.
It is not going to hurt or anything, but it is darn near impossible to get off. So, try your hardest not to get under your skin if you want to wear gloves.
I usually don’t wear gloves during DIY as the Can always slips out of my hands with gloves on.
If you start getting Foam out of the holes, don’t pick at it until it’s dry. Once it is dry, it’s straightforward to break off. But when it is wet, it just makes a terrible mess.
Make sure to check out this guide we have put together for those of you that want to see an honest review on the portable Zero Breeze cold air conditioner.
When you start spraying the Foam inside the lid of the ice chest, you will notice it will begin to expand and come out of some other drilled or manufactured holes, and that is normal.
Unless you have fast reflexes or the local champion at Whack-A-Mole, you’re never going to be able to clean it up in time.
The Foam will keep expanding away while it’s in there, you want to let it completely dry before you do anything else with it.
So just let it sit, let it expand. It’ll fill up all those crevices, insulate your super ice chest real nice.
Hardening and clean-up
After 24 hours to harden it’s time to chip off the spray foam cooler insulation that’s come out of the holes from your ice chest. You want to make sure this is good and hard and all the way through.
You don’t want it stopped in the middle because when you start prying these things off, you don’t want goop to get all over your hands.
That’s all it is from this point on, keep picking off the Foam that has come up through the holes.
If you’re a bit OCD like me and like your gear looking brand new, it may take some time to scrape everything off.
Here’s a little tip. If you cannot get it off with a chisel, get a scrape, or a barbecue brush, it helps break up the little bits of Foam with its harsh bristles.
Sealing your ice chest to avoid mold
Now, with your lid insulated, its time to seal up the exposed holes so that moisture cannot penetrate and make a home inside the lid and make it a moldy cooler environment.
You can seal the lid holes up with a few blobs of hot glue in. Whatever you do, make sure the paste that you use is a food-safe glue or silicone.
Reattaching the lid
Once the lid has been sealed up and super impenetrable, its time to put the finishing touches on your project and put the lid back on the cooler.
So now your Cooler should rival the most expensive cooler on the market for temperature retention, is what you can say to your friends and wife. But what about that feature you really-really want and that’s DIY bear proofing.
Bear proofing your ice chest
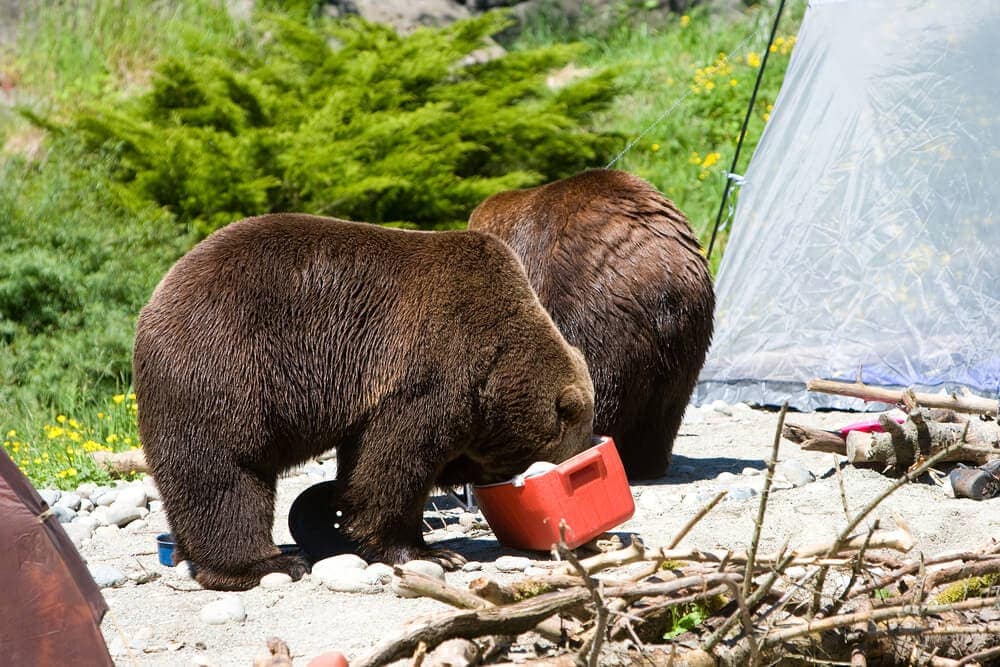
Now, it can often be a challenge Bear proofing a super Cooler. It’s not as difficult as it seems, so keep reading… Im going to show you how easy Bear proofing is.
Although I have not thoroughly tested this method, I have been told it works on protecting homes from burglars. What your going to need is;
- A sticky adhesive
- A 3D printer or regular inkjet or laser printer.
Step 1: Run a quick search on Google images for a ‘Bear Proof Logo’ and send it to your printer with the adhesive sticker paper at the ready.
Step 2: Print and peel the sticker
Step 3: Place the label on the insulated Cooler lid, and that’s it.
Your DIY Cooler has now leveled up entirely and is worth just shy of $1000.
That No Bears Logo right there proudly showcasing your Cooler ought to keep them annoying Bears away.
Wrapping up
So i hope you have enjoyed this DIY projects that you can make this at home with a little luck. You can go to a thrift store buy a cheap cooler.
In the end your on how to insulate your cooler lid result may be far better than any store bought cooler and sometimes for only ten bucks.
You may even have a cooler lying around in your garage that you can experiment on and hone your DIY craft.
And best of all if you mess up the insulation step or break the handles well at least you haven’t spent four hundred fifty five hundred dollars for a Yeti cooler.
Now that you’ve got your extra insulated super Bear-proof Cooler, it’s time to hit the road or trails. When people ask you about where you got your flashy Cooler from, make sure to send them to this article.
That’s all for now, happy camping and enjoy your old-new insulated Yeti Cooler. If you need tips on finding a hole in your air mattress or finding out how hot is a campfire click on the highlights.